Friday, September 14, 2012

Using color themes with Visual Studio 2012 Express Editions


Visual Studio 2012 ships out of the box with 2 color themes, Light and Dark. Many users have complained the Light theme is too gray, depressing and ugly, some went as far as to claim they’d commit suicide if they’d be forced to look a whole day to this UI.

Personally I think that’s an exaggeration. However, while I absolutely like the Dark theme, and I could use the Light theme without problems, sometimes I’d prefer a bit more color.

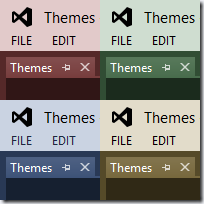
For Visual Studio 2012 Professional/Premium/Ultimate there is a free Visual Studio 2012 Color Theme Editor extension that Matt Johnson wrote. It adds a couple color themes such as Red, Green, Blue, Purple, Tan, Dark with Light editor, Light with Dark editor. It also allows creating new themes, editing colors, etc.

screenshot 

Unfortunately, the extension is not available for Express editions of Visual Studio (and usually Express editions don’t allow loading extensions). It seems like on Express you’d be forced to use only the Light/Dark themes… Well, that’s not true!

Below I’ll tell you how to install the color themes on a Visual Studio 2012 Express, and I’ll exemplify with the newly released Visual Studio Express for Windows Desktop.


1) First, download the zip file http://www.alinconstantin.net/download/VS2012Themes.zip – it contains the 7 pkgdef files defining the colors of the default themes from Matt’s extension.

2) Now, create a folder under "%ProgramFiles%\Microsoft Visual Studio 11.0\Common7\IDE\WDExpressExtensions”, and lets name it “Themes”. Unpack the zip file in that folder.

Pkgdefs

3) Open a ‘Developer Command Prompt for VS2012” window. In the command line, type “wdexpress.exe /updateconfiguration”. This will make Visual Studio to read the pkgdef files on next restart, and import the color themes into registry.

wdexpressupdateconfig

4) Launch Visual Studio Express, and now you should be able to see the new themes and switch them in Tools/Options dialog, Environment/General tab

RedWDExpress


Should someone with a VS Professional/Ultimate install use Matt’s extension to create/edit a custom theme that you want to use on Express, that’s also possible. On the machine with the VS install look under ‘%LocalAppData%\Microsoft\VisualStudio\11.0\Extensions’ folder. There should be some subfolders with random names, and one of them will contain a Colors.pkgdef file containing the theme of interest (open it with notepad and you should see in the beginning the theme’s name to confirm). Copy that file in the WDExpressExtensions\Themes folder, rename it to give it a more appropriate name (repeat steps 2-4), and you should be able to use the new custom theme.

Friday, August 31, 2012

Windows Live Mesh 2011 and Windows Essentials 2012

As you may know, Microsoft has replaced Windows Live Mesh from Windows Live Essentials 2011 with Microsoft

SkyDrive in the updated Windows Essentials 2012. While SkyDrive offers new interesting sync functionality, it does not completely replace all the functionality you had with Windows Live Mesh. I used to have a folder shared with my parents and sister where we could easily exchange pictures just by dropping new files in a local folder and have the file appear on my parent’s computer without any action necessary from their part. While Skydrive can be used for sharing, it requires my parents to look on the web in my Skydrive folder and manually download new files. (Why, Microsoft this usability regression?) If you’re like me and miss the removed functionality, please spend a few minutes and give Microsoft feedback about SkyDrive, if we’re many sending feedback hopefully Microsoft may reconsider the current decision.

Anyway, while I like the updated functionality from MovieMaker, SkyDrive, etc, I still want to run Live Mesh. But upgrading to Windows Essentials 2012 (downloadable from Essentials installer files for Windows 7, Windows 8, and Windows Server 2008 section) will remove Windows Live Essentials 2011 (downloadable from Essentials installer files for Windows Vista section). And the later will not install if you have already installed/upgraded to the 2012 version. Sad smile

So, here is how to install Windows Live Mesh 2011 after installing Windows Essentials 2012:

- open an elevated command prompt

- cd %ProgramFiles%\Common Files\Windows Live\ (or “Program Files (x86)” on 64-bit OS-es)

- make sure you exit any running Windows Live program (Messenger, Writer, etc)

- “attrib –s –h .cache” to change the attributes of the .cache folder

- delete the folder “rmdir /q/s .cache”

- now you can run the wlsetup-all.exe from Windows Live Essentials 2011 (download links above) and it won’t complain anymore about the newer version installed.

I got the idea after finding Jonathan’s blog, where he made available for download a Live Mesh Installer tool: http://messengergeek.wordpress.com/2012/08/09/installing-windows-live-mesh-2011-with-windows-essentials-2012/ The tool downloads WLE2011 web version and installs it even if you have 2012 version installed. It didn’t work for me (it failed to delete the .cache folder, I may have had WL programs running), but at least it pointed me in the right direction to which folder needs to be manually deleted to make things work. Thanks!

Thursday, August 30, 2012

Package-registered browsers/previewers in Visual Studio

Over the last months I’ve been asked twice how should a Visual Studio package register a new standard previewer that will show up in the BrowseWith… dialog. It turns out that MSDN documentation is not very explicit about what’s possible and what’s not. Also, there are a couple of holes in Manage Packet Framework (MPF) that will need additional explanation to avoid them. So here’s this article and sample hoping to bring some light.


In Visual Studio, when you right click a html file in Solution Explorer and choose BrowseWith… you can access a dialog listing all system-installed browsers (auto-detected by Visual Studio), package-registered browsers or browsers added explicitly by the user.

image

image

image


For user-registered browsers, in Visual Studio 2012 the “Add program” dialog has been changed to allow specifying explicitly program’s arguments, and the code has been changed to support saving and passing the arguments at the browser’s invocation time. (To some extent arguments could have been passed in VS2010 as well in the Program edit box, but that was not evident to the user, plus there were bugs that caused the arguments to be discarded in various situations).


Packages can also register browsers via the SVsUIShellOpenDocument service. Here is how adding a new browser is supposed to work:

1) the package should write a key under “Visual Studio\11.0\AddStandardPreviewer” with the package Guid. Unfortunately there is no RegistrationAttribute helper class in MPF that can be used to declare these keys, so you’d have to write your own.

2) at the appropriate time, the environment parses the registry entries and calls ResetDefaults, passing in a value of PKGRF_ADDSTDPREVIEWER for the grfFlags parameter on the VSPackage. Unfortunately, the Package class in MPF already implements ResetDefaults() and does not allow derived classes to override virtual functions for registering previewers.

3) at that point the VSPackage should call IVsUIShellOpenDocument.AddStandardPreviewer. The function however does not have an explicit argument for passing browser’s arguments (it only has ‘string pszExePath’ suggesting the browser’s executable and not the actual command line string), so it may not be clear this thing is possible/supported.

To demonstrate how a package can register a browser, I wrote a sample, Example.BrowseWithExplorer.zip that implements a package registering 2 browsers: Internet Explorer InPrivate (allowing InPrivate previewing of the file of interest) and Internet Explorer Kiosk (which opens the browser without toolbars, menus, status bar, tabs, etc. – to close the browser use Alt-F4).


Example.BrowseWithExplorer

The sample defines a registration attribute, ProvideStandardPreviewerAttribute, that can be used on the package class to declare the package will register standard previewers. Hopefully, future versions of MPF will include such class so you won’t have to write your own.

regprev

Then, the package will have to re-implement the IVsPackage interface as shown in the above picture, and re-implement the ResetDefaults method so it can intercept the calls with __VSPKGRESETFLAGS.PKGRF_ADDSTDPREVIEWER flag

image

As for the browser’s invocation, when registering a standard previewer, the first argument in the AddStandardPreviewer allows specifying command line arguments for the previewer in addition to the path to the browser's executable. If there are no quotes in the path, the whole string is assumed to be the full path to the binary exe file of the previewer. However, if the pszExePath string beings with a quote (quotes are used around the executable binary) then arguments can be added separated by a space from the quoted filename.

%1, %URL or %url can be used in the arguments list, and Visual Studio will replace it at runtime with the name of the file to be previewed, (as a URL-formatted quoted string, e.g. "file:///C:/temp/My%20File.txt" ).  If the arguments don't contain either of %1, %URL, %url, then Visual Studio will append the file name to be previewed to the pszExePath string before launching the previewer process with that concatenated string as arguments.
Multiple previewers can be registered with the same executable path if the list of arguments passed are different.

The 2 browsers registered by the sample invoke “IExplore.exe –k [filename]” for the Kiosk mode and “IExplore.exe –private [filename]” for InPrivate browsing, as described in Internet Explorer Command-Line Options MSDN article.


And finally, a few words about the system browsers listed in the dialog. When the OpenWith… dialog is displayed, Visual Studio will try to detect the browsers installed on the system. These browsers cannot be deleted from the dialog (well, you can delete them but they will re-detected and will appear back next time the dialog is reopen, unless the browser has been uninstalled at that point). In order to detect system browsers, Visual Studio looks in a couple of known locations:

- The shell\open\command for the ProgID associated with the http protocol for the current user or with the .htm files.

- The Default value under HKLM\Software\Microsoft\Windows\CurrentVersion\App Paths\[Executable.exe] or HKCU\Software\Microsoft\Windows\CurrentVersion\App Paths\[Executable.exe]

- HKCR\Applications\[Executable.exe]\Shell\Open\Command, for a couple of known executable of browsers with highest market use share.

- HKCU\SOFTWARE\Clients\StartMenuInternet and HKLM\SOFTWARE\Clients\StartMenuInternet, as described in this MSDN article http://msdn.microsoft.com/en-us/library/dd203067%28VS.85%29.aspx

Some browsers don’t write any version-independent registry values that can be used to locate their executable, hence they are not listed in the dialog unless they are also made the default system browser. Current examples of browsers with bad registration are SRWare Iron, Maxthon, Lynx. System browsers are encouraged to write their registration under StartMenuInternet so they can be detected by Visual Studio and Windows (and be listed in Windows’ Change Program Defaults dialogs as well).


The sample in this article can be downloaded from: http://www.alinconstantin.net/Download/Example.BrowseWithExplorer.zip

Wednesday, August 29, 2012

Notepad.exe command line arguments

I was looking for Notepad’s arguments for a sample I’m thinking of writing; I’ve searched the net and found some of these, and had to investigate a bit to find out about the others. I’m a bit surprised it only supports so few flags, I was expecting at least a “go to line” capability. Anyway, here they are:

/A      Ansi: notepad /a file.txt Opens the specified file as Ansi (overrides encoding auto-detection)

/W      Wide: notepad /w file.txt Opens the specified file as Unicode (overrides encoding auto-detection)

/P      Print: notepad /p file.txt Opens the file, prints its content to the default printer and exit

/PT     PrintTo: notepad /pt “file.txt” “<printername>” prints the file to the specified printer. Both the filename and the printer name have to be in quotes, regardless of the names containing spaces or not. E.g.: notepad /pt “file.txt” “Send To OneNote 2013” or notepad /pt “file.txt” “\\Server\SharedPrinter”

/.SETUP SetupMode: E.g. notepad /.setup file.txt.  I’m unclear what this is used for. It’s a weird mode, it does not repaint the window if it was started restored. You’d have to press Alt-Space and Maximize it to view the file content. The window has 2 sets of scrollbars in that case (one set is apparently unused), and it closes if Escape or Ctrl+D are pressed. Perhaps some setup programs invoke notepad with these arguments to display the EULA? Who knows.


That being said, for a better small & fast replacement of notepad, I suggest using SaneStudio’s NitroLite, downloadable from http://sanestudios.com/n2.html. No installation needed, at only ~100kb, it packs loads of features, syntax coloring, binary editor, etc.

Friday, August 17, 2012

Windows update error 0x8024402F

I run yesterday into a weird error, for which I spent half of day to solve the problem. It’s unlikely you’d run into the same problem, so this is more for me to remember what I did to fix it in case I run into this again…

Yesterday I upgraded my laptop to Windows 8 Pro and installed Office 2013 Consumer Preview (upgrade from Win7 Ultimate/Office 2010). After the upgrade, when I tried to install latest Windows updates, I kept getting error 0x8024402F.

I tried the Help page on the error code, I launched the troubleshooter there (which claimed it could be a problem with the server connection, and claimed to have applied fixes), but all lead to nothing.

Knowing in the past I had trouble with Windows Update I searched my blog, which pointed out to problems related to UseWUServer set when I joined CorpNet. I left corp.microsoft.com domain and joined my home domain, but that only cost me 2 reboots and still didn’t fix anything.

I searched the the net for the error code, I found more KnowledgeBase pages with more FixIt installers which also did not fix the problem.

From http://support.microsoft.com/kb/836941 I found out the error code means WU_E_PT_ECP_SUCCEEDED_WITH_ERRORS. Further searches on the named error pointed to a WindowsUpdate.log file (instructions for reading it are at http://support.microsoft.com/kb/902093).

I looked in the log file and it contained more error details like this:

1060 15a8 PT WARNING: ECP: Failed to validate cab file digest downloaded from http://www.download.windowsupdate.com/msdownload/update/software/svpk/2008/06/1319061_d1590aa04b224974f0cf46ee7937bda90a815268.cab with error 0x80246003

Great, now I was looking for a different error code, 0x80246003. A search on the error number on Internet didn’t find any solution. The only thing I could find is a KB page http://support.microsoft.com/kb/938205 where I learned the error code 0x80246003 is WU_E_DM_UNKNOWNALGORITHM “A download manager operation could not be completed because the file metadata requested an unrecognized hash algorithm.”
Further searches on the named error lead nowhere. I tried re-registering the cryptographic providers dlls, comparing with other machines where things were working, all to no avail.

I run ProcMon searching for failures (when in doubt, run Process Monitor), but again this didn’t help.

I searched the internal Corpnet site for the error code or named error, but that also didn’t lead to a solutions.

Ultimately, I searched the source code. The error code is returned from only one place, from a failed test checking whether test keys are allowed. This had 2 parts:

- checking whether I had a file AUTest.cab in %windir%\SoftwareDistribution folder

- checking whether HKLM\SOFTWARE\Microsoft\Windows\CurrentVersion\WindowsUpdate\Test\AllowSHA1ContentHash = (dword)1

ProcMon should have shown these as well (at least the first one, to begin with), probably I just missed the line between so many other failures.  Anyway, I set easily the registry value, but I didn’t have the file on any other machine where things were working fine.

After more CorpNet searches I found on http://mswikis/wukipedia/Wiki%20Pages/What%20is%20autest.cab.aspx where to get this test cab file (I needed to obtain a latest version anyway, since the file is signed and expires every 2 weeks).

I copied it to SoftwareDistribution folder, stopped and restarted the Windows Update service (‘net stop wuauserv’/’net start wuauserv’), and next time I tried Windows Update the update finally succeeded! After that I deleted the test cab file, and after that the updates still seem to work fine.

I suspect some internal test qfe was installed on my laptop when I joined CorpNet a while ago (giving the old ‘svpk/2008/06’ date of the update, suggesting some Win7 pre-service pack timeframe), and it was causing trouble now.

Anyway, I’m glad the problem seems fixed, but just in case here is this article to remind me the solution in case I run into this ever again.

Thursday, August 9, 2012

How to Shut Down or Restart Windows 8 when connected via Remote Desktop


If you connect via Remote Desktop /Terminal Services to a machine running Windows 8 and have tried to shut it down or restart it, you may have hard times finding out how to shut it down.

Normally, a Windows 8 machine can be restarted by accessing the Settings screen by pressing WinKey+I (or by accessing Charms with WinKey+C and clicking the bottom Settings icon), then by clicking the Power button and selecting Restart / ShutDown from the menu that open.

However, when connected via Remote Desktop, Windows 8 offers in the menu only a “Disconnect” option…

CharmsSettings

Another way to access usually the restart options are to press Ctrl+Alt+Del , then click the Power button there and select Restart / Shut Down from the menu that opens. When connected via Remote Desktop, you can access the power button with Ctrl+Alt+End ( Ctrl+Alt+Del displays the lock screen on the host machine, not on the machine you’re connected to), but again Windows 8 offers there only the “”Disconnect” option (despite the tooltip on the button indicating Shut Down).

CtrlAltEnd


So, how to restart Windows 8 when connected via Remote Desktop?

Since most of the time I have a Command Prompt window open (can easily open one with WinKey+R, type “cmd” and Enter), until now I’ve restarted the machine by typing “shutdown –r –f” in the command window, then agreeing with a notification that Windows will soon restart, or waiting ~30 seconds for the machine to restart automatically. If you just need to shut down the machine, don’t pass the “-r” argument.

ShutdownRF

Today I found out another way to restart the computer: you can access the desktop (e.g. by pressing WinKey+D = Desktop, or WinKey+M = MinimizeAll), then press Alt+F4.  This displays a Shut Down Windows dialog, where all the options are available! Ah, the good ol’ Desktop…

AltF4

And, finally if you are a mouse person and prefer a one-click solution, you can create a shortcut to shutdown.exe, then right click it and pin the shortcut to the StartMenu. From now on you’ll be able to shutdown the machine by double clicking the icon on the Start screen or on desktop.

ShutdownShortcut

Monday, August 6, 2012

How to implement a Quick Launch search provider for Visual Studio 2012


A new feature in Visual Studio 2012 is the Quick Launch which allows searching menu items, tools options, and various other things in VS. It drives its roots from a similar feature provided in Visual Studio 2012 part of the Productivity Power Pack under the Quick Access name.
QuickLaunch

The following article will tell you how to write a Visual Studio Search Provider integrating with Quick Launch and will demonstrate the functionality with a sample

Visual Studio 2012 comes with only 4 providers out of the box: menu item, tools options, open documents and most-recently used items. Additional providers can be implemented to extend Quick Launch searches. I believe Microsoft will provide more extension packages and samples but until it does, I’m providing here a primer for writing a new search provider and a sample implementing 2 providers: Fruits and Vegetables, providing their results from 2 hardcoded lists of items.
QLFruitsAndVeggies
While Quick Launch is the official feature name, the Visual Studio interfaces supporting the feature use GlobalSearch in the name. The QuickLaunch feature can be accessed from the SVsGlobalSearch service that implements IVsGlobalSeach and IVsGlobalSearchUI interfaces.
Providers for Quick Launch are objects implementing the IVsSearchProvider interface. They are identified by their unique id (GUID), and they also need to have a unique shortcut string (more on this later).
There are 2 ways to register a new provider for Quick Launch:
1) Dynamic: a loaded package can use IVsGlobalSearch.RegisterProvider interface and pass in the provider object. Dynamic providers can also be unregistered when no longer needed; static providers cannot be unregistered. The provider is available only after the package is loaded; packages may need to use auto-load feature in VS to make sure they get loaded before the user needs their search features. Due to an implementation detail, you can’t use in the same package both dynamic and static registered providers (at least in VS2012 RTM).
2) Static: This is the most common way. In the appid’s configuration hive, under the SearchProviders key, create a subkey with the provider’s Guid, and under it declare the Package Guid implementing the provider. The Name is optional, but is recommended to write one so the providers can be quickly identified at a glance in registry.
[HKCU\Software\Microsoft\VisualStudio\11.0_Config\SearchProviders\{9ba8f997-b098-41c9-b360-fecaa397c94f}]
“Name”=”Fruits search provider”
“Package”=”{0bdb8b31-2ee3-4cd9-893a-d0b11d335f06}”


When the providers are loaded, Visual Studio loads the package implementing the provider. The package must implement the IVsPackageExtensionProvider interface, and Visual Studio will call the CreateExtensionInstance with extensionPoint = IVsSearchProvider interface’s guid, and the interface = guid identifier of the search provider (as declared in registry). The package can then create an instance of the search provider and return the object.


When implementing managed search providers, all this extensibility hook-up can be automatically done by using classes from Microsoft.VisualStudio.Shell.11.0.dll.


1) First, make sure the class implementing the search provider is attributed with the Guid identifying the provider


image


2) Derive the package class from the ExtensionPackage class in Microsoft.VisualStudio.Shell namespace


3) Declare the search provider with ProvideSearchProvider registration attribute on the package class.


image


As mentioned before, search providers are identified by 2 things:


- the provider ID, a Guid


- the provider shortcut: this is a fixed string (in the sample case, “fruits” or “veg”) which allows performing searches only against this provider, e.g. “@fruits apple” will search for “apple” only in the fruits search provider


One of the most important functions in a search provider is the CreateSearch function. Providers are called to create search tasks for the user’s input, then tasks are called on background threads to perform the actual search.  To implement a search task I recommend deriving from VsSearchTask in MPF which provides default implementations for IVsSearchTask interface, tracking search status, or notifying the global search manager about the task’s search progress. Usually, if you derive from the class you only have to override and implement the OnStartSearch method, which lets you focus on the important part – perform the actual match/search.


Search tasks have to perform very fast. The search manager will only display results that are returned in the first 1000ms, to avoid results and user’s selection ‘jumping’ in the pane after a certain time. If you don’t see any results from your search provider in the pane, it’s either you haven’t reported any results within 1s, or there are many search providers installed in the system and there wasn’t place in the popup to display results from your provider after displaying up to 3 items from other search providers that reported results faster, or from the built-in providers. When reporting search results resultant of slow operations (such as http:// queries to some online search service), it is advisable to query for only top 5-10 items that match, such that the web query return faster and you get to report at least 1 results in the first second.


Download the Quick Launch Sample


http://www.alinconstantin.net/download/Example.QuickLaunchSearchProvider.zip