Wednesday, November 5, 2008

How to migrate from SourceSafe 6.0 to VSS 2005


I’ve seen this question asked a couple of times, so I thought it might be time to write a blog entry to have people to point to when I’ll see it again…

Let me start by saying there are no database format changes between VSS6.0 and VSS2005, thus there is no need to convert the database (like it was the case with previous versions). VSS 6.0 can use a database created with VSS 2005, and vice versa (and only VSS2005 will benefit from new features like checkout local version, time zones, etc).

There are two possible migration paths:

a) Want to upgrade from VSS 6.0 to VSS 2005 on the same machine

Since there is no database conversion required, all you need to do is to install VSS 2005. You may install VSS6 and VSS2005 side by side if you want to test the new bits, but should you decide to uninstall VSS6 you will need to repair your VSS2005 installation (or reinstall it).

I recommend uninstalling first VSS 6.0. The uninstall will not delete existing VSS databases on the machine. After that, simply install VSS 2005. If you do it in this order, all the VSS binaries (ssapi.dll, ssscc.dll) will remain registered correctly, and you should be able to just open VSS2005 and have things working as before.

b) Have a machine with VSS 6.0 but want to setup a  new server with VSS2005

Start by setting up the new server machine (install OS, etc.), install IIS if you need to use the database with FrontPage or plan to use VSS remote.

Install VSS2005 on the new machine. VSS2005 does not create a new database on setup, like it was the case with VSS6.0.

A VSS database is comprised by a couple of files on a network share. You will have to copy the VSS databases from the existing machine onto the new machine. Identify the VSS database folders on the old machine. Make sure there are no users still accessing the old database (a good way to do this is to disconnect/remove the network shares on the old machine). Copy the database folder into a new folder on the new machine. Any recursive copy command can be used (xcopy /s, robocopy /mir, WindowsExplorer, etc). On the new machine, share the database folder.

If you’ve been using the VSS database with FrontPage Server Extensions, you’ll need to write a registry key on the new machine. The VSS2005 installer can’t write this key for you like VSS6 did, because it does not create a new database during setup.

[HKEY_LOCAL_MACHINE\SOFTWARE\Microsoft\SourceSafe]

“API Current Database”=”Path to the database on the new machine”

Have all other VSS database users uninstall their VSS 6.0 and install VSS2005. While the database can be used in a mixed client environment, it’s recommended that all clients use VSS2005 to benefit of the new features and avoid inconveniences (e.g. VSS6 users won’t be able to merge UTF8 or Unicode files checked in with VSS2005).

Communicate the new database path to all all other team members and have them open the new VSS database by pointing VSS Explorer to the new database.

You may also want now to consider using the new features of VSS 2005. E.g In SSAdmin, Tools/Options/General page consider whether you want to enable CheckoutLocalVersion, set a time zone for the database in the TimeZones tab, use Server/Configure dialog and decide whether you will use this database for remote access or want to configure the LAN service for better performance on LAN, etc.

Sunday, June 29, 2008

Cannot see shared folders or mapped drives on XBox 360's Media Center Extender that are visible on the Vista Media Center PC

On my Vista PC named Jupiter and running Media Center, I logon as Alin and I am able to see shares from another computers (e.g. from a Linux box that is my NAS device). Some of these drives are mapped to local drives on my account, e.g. M:\ -> \\nas\media\music

I setup my Xbox 360 as a Media Center Extender, however when I go to the Library setup and I try to add a new folder to the library, I am no able to select the shares from my NAS device: in the local drives I only see the C:\ drive, and in the folders shared by other computers I don't see the shares from the Linux box...

Media Center Extender uses a local username named something like MCX1 on the MC PC. It is for this MCX1 user that you have to map a drive to the shared folder to make it appear in the Library as a local drive... This can be done with a NetLogon script.

Start by creating a folder %Windir%\System32\Repl\Import\Scripts. Now create a batch file, where you map the drives.  An example might look like this:

    @echo off
set CREDENTIALS=/user:LinuxBox\[Username] [Password]
net use P: "\\LinuxBox\media\Pictures" %CREDENTIALS%
net use M: "\\LinuxBox\media\Music" %CREDENTIALS%


Save this file in the folder you created earlier, e.g. as MCXLogonScript.cmd. The location is important. I've read articles this logon file should be placed in C:\netlogon; the help mentions it should be saved in \\vistapc\netlogon share, etc., but none of those worked for me. I found the correct path where Windows was looking for the file with ProcessMonitor, and that path on my Vista box was %Windir%\System32\Repl\Import\Scripts.


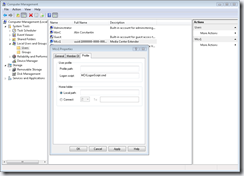
It's time to associate the logon script with the MCX1 user.  Go to Control Panel -> Administrative Tools -> Computer Management. Under SystemTools/LocalUsersAndGroups/Users, select the MCX1 user and display its Properties. In the Profile tab, type just the file name, MCXLogonScript.cmd.


mcxlogonscript


Go to the XBox 360. Close and reopen Media Center here - it will logout and re-login on the PC with the MCX1 user, and this time it will read the logon script and map the drives. If you go now to Tasks/Setting/LibrarySetup and choose AddFoldersToWatch and select AddFoldersOnThisComputer, now you should see the M:\ and P:\ drives that were mapped by the logon script beside the C:\ drive.

Windows Media Center not recognizing and not displaying jpg images - showing "unable to display picture" error

Last week I tried to view on my TV a couple of pictures recently snapped using an XBox 360 as a Media Center Extender connected to my Vista PC. As much as I tried, I could not convince the Media Center to display the pictures - it was simply not recognizing them. Here are the symptoms I was experiencing:

1) adding the folder containing the pictures to the Media Center Library (using WMC interface) was recognizing the number of files, but when to display the pictures in that folder, it was showing "0 pictures". I tried with folders placed in different locations (my account's Pictures folder, the Public Pictures folder, a network folder on my NAS box, etc) without any success.

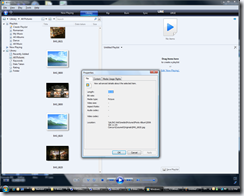
2) adding the folder containing the pictures using Media Player's Library worked halfway. When the pictures were added from a NAS folder the pictures were added to the library, but Media Player was not able to show their mediathumbnails (for some reason, it was showing correctly the CR2 files, but not the JPG files).  Photo cameras write the images on memory cards,which are usually formatted as FAT, and the names are capitalized, like IMG_0001.JPG. I was copying the photos on my Infrant ReadyNAS 600 device which uses Linux/ext2 as the file system, which is case sensitive. When MediaPlayer was adding the images to its library, he was changing the case of the extension, and was adding the files as IMG_0001.jpg (This could be seen by looking at the Properties of the file in the library). Because the files were hosted on a case-sensitive Samba share on my NAS/Linux box, trying to view the file was displaying "File not found" errors. It believe this is a bug in MediaPlayer, so I reported it to Microsoft. Meanwhile, I looked at Infrant/Netgear ReadyNAS add-ons and I found ToggleCaseSensitivity that I used to switch the file system to be case-insensitive. After this, MediaPlayer showed correctly all the files in its library.

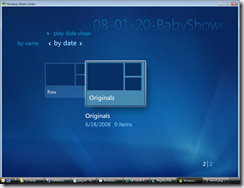
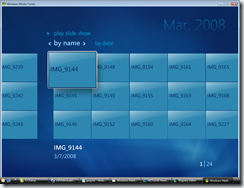
3) now back to MediaCenter. WMC reuses the MediaPlayer's library, thus it should have displayed the files I was able to see with MediaPlayer. However, that turned out not to work as expected. I tried to browse the library ByFolder, and I was navigating to the folders with pictures, but they only displayed "0 items". Trying to enter the folder showed "No pictures were found" message. I also tried to browse the library ByDate, navigate to the year and month when the pictures were taken. This had a bit more success in the sense that at least it displayed the file names. However, only placeholders were shown for all pictures, with just the picture names. Clicking on one of the files to show the picture caused Media Center to show a message "Unable to display the picture".wmc2wmc1

I searched the net and found that many other users had similar problems; there were references to the jpg file associations being messed up.

Indeed, in the registry the file associations for the jpg extension was looking like this:

   [HKEY_CLASSES_ROOT\.JPG]
@="JPG_auto_file"
"Content Type"="image/jpeg"


Comparing with the setting of another Vista machine, it turned out the important part missing that was causing MediaCenter to skip the files was a missing PerceivedType registry value, that should have been set to image. (The ContentType was also missing - I restored a couple of weeks ago, when I discovered without it Windows Live Writer has troubles with images - see previous posts). I was also missing the PersistentHandler setting; the  JPG_auto_file was written by IrfanView, which was associated with the jpg files. I don't know if IrfanView was responsible or not for the missing values...


Anyway, by default, the registry values should look like this:


   [HKEY_CLASSES_ROOT\.jpg]
@="jpegfile"
"Content Type"="image/jpeg"
"PerceivedType"="image"


wmc3I was missing similar keys for the  *.jpeg file association.


So I manually added the PerceivedType setting in registry and I've restarted MediaCenter; it immediately recognized the jpg pictures, and now everything looks good again!


If you want to restore the jpg/jpeg file associations to their default values, you can edit manually the registry or you can save the setting below to a file with *.reg extension, then double click the file in Explorer.


----------------------------------------
Windows Registry Editor Version 5.00

[HKEY_CLASSES_ROOT\.jpg]
@="jpegfile"
"Content Type"="image/jpeg"
"PerceivedType"="image"

[HKEY_CLASSES_ROOT\.jpg\OpenWithProgids]
"jpegfile"=""
"WindowsLive.PhotoGallery.jpg.12.0"=""

[HKEY_CLASSES_ROOT\.jpg\PersistentHandler]
@="{098f2470-bae0-11cd-b579-08002b30bfeb}"

[HKEY_CLASSES_ROOT\.jpeg]
@="jpegfile"
"Content Type"="image/jpeg"
"PerceivedType"="image"

[HKEY_CLASSES_ROOT\.jpeg\OpenWithProgids]
"jpegfile"=""
"WindowsLive.PhotoGallery.jpg.12.0"=""

[HKEY_CLASSES_ROOT\.jpeg\PersistentHandler]
@="{098f2470-bae0-11cd-b579-08002b30bfeb}"
----------------------------------------

Saturday, June 21, 2008

Speeding up Windows Vista boot and shutdown times


One of my friends installed today Vista and complained the boot was taking almost 2 minutes, much longer than in XP. I became curious and I thought I should check on my system what are the boot times...

I have Vista installed fore a year and a half now, and I don't boot my computer very often. It turned out that for my system, the boot time took more than 4 minutes!!! 1 minute until the login screen, 4 minutes until the system was idle - this was on a Intel DualCore 6600 (2.4GHz) with 2 GB RAM, the machine I bought in December 2006.

It turns out Microsoft has released some great tools, XBootMgr and Performance Analyzer, that can help you improving the performance of the boot and shutdown times. They are included in  Windows Performance Tools Kit. For help with running the tool, see the On/Off Transition Performance Analyzer page. I downloaded the kit and installed it in C:\Program Files\Microsoft Windows Performance Toolkit.

You should also download the autologon.exe tool. It allows you specifying a username and password that will be used for automatic logon during the performance measuring process. I downloaded the zip file and extracted the tool. From an elevated command prompt, I run the tool like "autologon /username:Constantin\Alin /set" and typed my password. (To open an elevated command prompt, open StartMenu, write "command" in the search box, right click the "Command Prompt" and select "Run as Administrator")

I did a first run with "xbootmgr.exe -trace boot" (the computer will restart automatically in 5 seconds after running the command). As I told you before, the first boot took more than 4 minutes. After reboot I run  "Performance Analyzer" from the icon installed in StartMenu (or run xperfview), and use the Trace/Open menu item to open the *.etl (event trace log) file saved in the same folder. At a first look it's pretty confusing understanding the log graphs, but the first thing that was clear was that disk accesses were slowing things down. The CPU was used 20% average, but the disk was hit really hard, close to 100% all the time.

Here are some simple things that you can try to reduce the disk access times:

1) Defragment the harddrive. The defragmenter in Vista can be invoked from StartMenu (search for "defrag"). Click the "Defragment Now" button in the dialog and select the drives to defragment. The UI sucks, as there is no progress indicator. You can also invoke the tool from command line ("defrag C: -a -w" if you want to perform a full defragmentation), but again there is no progress indicator. Expect to wait a couple of hours to complete...

2) Eliminate unneeded services and startup programs. Nowadays almost every program you install thinks it's necessary to add either a service or a program to run at computer startup, without you actually needing that functionality, or adding features that can be accessed other ways.

The tools to use for eliminating unneeded services and startup programs are the ServiceManager (accessible from StartMenu, search for "Services"), and either Autoruns, Windows Defender (in Tools/SoftwareExplorer/Startup Programs), or if you're familiar with the registry use directly RegEdit.exe and look under the following keys: HKLM\Software\Microsoft\Windows\CurrentVersion\Run and HKCU\Software\Microsoft\Windows\CurrentVersion\Run.

For services, look at the services that are Started and decide whether you need them. Look especially for 3rd party services. If you're not sure what a service does, search its name or the program name on Google, or on sites like BleepingComputer, and you'll find information describing them. If you don't need these services, set them to Disabled or Manual.

For applications, I prefer leaving the keys in registry in case I need them at a later time, but prefix the application paths with something like "donotrunthisapp" that will cause Windows to skip running the application because it won't find a donotrunthisapp.exe executable.

a) Services used by hardware I don't have. If you don't have on your computer devices using Bluetooth, SmartCard, WiFi, TabletPCPen, there is no reason why you'd keep these services enabled...

b) Helper programs. There are a lot of these, and I haven't found any downsides by stopping them.

c) Update checkers. A lot of applications install either services or startup programs that checks whether they are any updates available for them. I don't understand why these programs needs check for updates on every boot instead of scheduling a task or even better when they are used to run once every week.

d) Speed launchers and cache managers. Yes, they may speed up their application, but when their number is growing, they reduce the overall performance of the system...

Here is a list of what applications I disabled on my machine (I was amazed myself how big the list was):

Services:  PnkBstrA (PunkBuster Service Component installed by BattleField game and not removed when the game was uninstalled), GoogleUpdater (installed by GoogleEarth), NVIDIA Display Driver Service (some helper service), Adobe LM (set to Manual instead of Disabled, this is the license manager for Adobe software and will be started when needed), NMIndexingService (Nero media indexing service), Creative ALchemy AL1 Licensing Service (I set to Manual), Cyberlink RichVideo Service (RichVideo - I don't need enhanced video editing support), Bluetooth Support Service, Tablet PC Input Service, Smart Card, Smart Card Removal Policy, TPM Base Services (I set to AutomaticDelayed), etc.

Startup programs: CTHelper and CTxHlp (Creative help programs and API extensions), NMIndexStoreSvr (more Nero indexing), NBKeyScan (used by NeroBackItUp), Steam (used by HalfLife games), RemoteControl, LanguageShortcut and BDRegion (used by Cyberlink DVD software), Adobe Reader Speed Launcher, ehTray (used by MediaCenter tray application), other update software like QuickTime Task, SunJavaUpdateSched, TkBellExe (for RealPlayer),  NvCplDaemon (not needed, I don't overclock the graphic card), NvMediaCenter (not needed to run in tray, display settings can be changed in control panel), etc.

This is where the biggest improvement came from. After this step, the boot took only 2:10 minutes (30 seconds till the logon screen, 30 more seconds until the desktop appeared, 2:10 until idle)

3) Finally, run again the performance tool to force existing internal operating system optimization mechanisms to update their state based on the current configuration of the system.

To do this, I run the "xbootmgr.exe -trace boot -prepSystem". For me it rebooted the computer twice. On the first reboot, it decreased the boot time to 1:55 minutes (30 sec until login, 45 until desktop was shown, 1:55 until idle). It then took about 15 minutes to optimize the boot performance, and rebooted again. This time, the whole boot process took 1:08 !!! (26 seconds till login, 1:08 until idle).

In the end, don't forget to disable the automatic logon. From an elevated command prompt, run the tool like "autologon /delete"


In conclusion, out of 21 applications I was running on startup, I kept only 6 of them I needed; I also removed 10 unneeded services; defragmented the harddrive and optimized the booting time. With all these changes, I was able to reduce the Vista boot time on my computer from more than 4 minutes to only 1 minute and 10 seconds (with the desktop usable in less than 45 seconds)!

Monday, June 16, 2008

Using Windows Live Writer to post on Google-hosted blog

A while ago Microsoft released Windows Live Writer as part of the update to the Windows Live suite, so I thought to give it a try.

Of course, it was easy to set it up to post on my spaces.live.com - hosted blogs, but it was more interesting to see that it worked fine with my blogspot.com - hosted blog, which is owned by Google...

Here is how to set it up:

  1. Use the Weblog / Add Weblog Account menu item to launch the wizard
  2. Select Another weblog service and type in the weblog address. If you point directly to the weblog. (e.g. http://alinconstantin.blogspot.com), type in the username and password and click next it will just work. However, I found a more interesting way of setting it up by typing in the address of the blog provider page, e.g. http://www.blogger.com. When I clicked Next I was presented with another page where I was instructed to select the service provider type. You can see in the image below the list of all blog providers that are recognized by Writer:
    Blog providers recognized by Windows Live Writer
  3. Writer asks next the address of page used to post remotely, which for Blogger is in the format: http://www.blogger.com/feeds/<feed-id>/posts/full (the template is suggested by LiveWritter)
  4. So you have to fill in the feed-id. For Blogger, you can find the ID by going to your blog Dashboard page, hovering the mouse over the New Post link, and looking in the status bar (you can right click the link and Copy to clipboard to get the number easier). You can replace the <feed-id> in the URL with that number, click Next and the blog setup will be complete. Obtaining the feed ID for your blog on Blogger

I played a bit with Writer and it's a breeze writing new posts.

Adding images and changing their properties is also easy (no more adding the image in Blogger's editor and having to mess up with the HTML, no more image added in the beginning of the post no matter where it's inserted, etc) . However, you may run into problems when trying to publish or save draft a post containing images (in fact this post was written the next day LiveWritter was made public, but I could only post it now, when I found the solution to this problem). If your post contains images, you may receive an error message "File Upload Failed" telling you "The remote server returned an error: (400) Bad Request.". It turns out this is caused by missing registry entries for files associations for jpg, png and gif files. Joe Cheng has a solution for the 400 Bad Request File Upload error in LiveWritter. Indeed, on my machine the ContentType of these file types was missing; Joe's registry fix worked like a charm...

Anyway, from now on I'll be using Live Writer to write these posts...

(written using Windows Live Writer)

Saturday, June 14, 2008

How to exit full-screen mode for TSClient in Ubuntu

If you made the mistake of using TsClient in Ubuntu and connecting to a Windows machine in full-screen mode, you may find hard to exit the Remote Desktop because there is no 'control bar' at the top of the TS window, the same way there is one in Windows' equivalent Mstsc.
You simply can't click any buttton to minimize the window and see the Linux desktop...

You can use Ctrl+Alt+Enter to toggle the full-screen mode, but with a caveat: if you enabled desktop effects, pressing Ctrl+Alt+Enter appears to do nothing except flashes the screen...
If you have desktop effects enabled, use Ctrl+Alt+Left or use Ctrl+Alt+Right arrows after using Ctrl+Alt+Enter to toggle between the two virtual desktops used by Ubuntu.

Note that Ctrl-Alt-Enter toggles two modes: one in which you can switch the desktops with Ctrl+Alt+arrows, and another one in which the arrows don't work, but you can zoom with WinKey+1,WinKey+2, Winkey+3, etc. If you find the arrows not working, press again Ctrl-Alt-Enter to enter the other mode in which Ctrl+Alt+Left / Ctrl+Alt+Right will work.

Monday, June 9, 2008

The year of Linux on Desktop? Nah, not this time...

Every year I hear freetards proclaiming that year is the year of linux on desktop, when Windows' reign will be overturned. Every year another distribution is "the one" to have, going from RedHat to Suse to Debian to Fedora to Ubuntu to etc, etc...

So I thought I should take a closer look at this much praised Ubuntu.


Back in college days I used to play a lot with Slakware and RedHat, so I'm not entirely a newbie to linux. However, since I got a real job the free time became scarce. I stopped using linux about 5 years ago, when I realized I was spending more time fixing things than doing something productive with it.


I decided to install Ubuntu 8.04 "Hardy Heron" (latest available) on my laptop, a HP Pavilion tx1320Us.


Someone deciding to download a distribution should do it from multiple places, otherwise he might miss important notices. For instance, Hardy is plagued with a critical bug in SSL handling. Only some of the download sites warned me about this, and advised to check immediately for updates and patch the install (-)


From the beginning I liked the idea of the "Live CD". It allowed me to get a feeling of what the final experience will be (+).


Selecting the partition to install was confusing (-). I had no free space on the drive, and I had no idea what changes was the installer going to make if I were to select an existing Windows partition. Eventually I booted Vista, resized the partition from there, then restarted the Linux install on the free space. I considered using the manual partitioning, but eventually I decided to let Ubuntu installer do the partitioning. Again I would have liked more information what the automated partitioning was about to do to the drive...


The rest of the install process was easy and with no further problems (+).


Selecting the computer time is incorrect and confusing (-). For some reason, the automated install picked a wrong time for the machine, a couple of hours shifted from the reality. I have no idea why that happened, the time in BIOS was correct... Anyway, I chose to set the time manually. Selecting a timezone is done by selecting a city. The list of available options is limited (e.g. Seattle is not listed, the closer on US Pacific coast are Vancouver and L.A., so I chose the former). The timezone was shown as PDT=GMT-7, when in reality it should have been PDT=GMT-8 and using DST. There was no option for daylight saving time.


Anyway, I was amazed to see things working. A couple of years ago I wouldn't even have dream about installing linux on a laptop for lack of drivers. Now, almost everything was working out of the box: bluetooth, touchpad, sound keys, etc. (+). Only the WiFi was not working (but more on that later)


First thing I updated the computer. It downloaded "only" 125MB of updates. (Windows bashers compain about the size of initial updates; I guess linux is no different; anyway, that's ok, the security of the system is more important)


I found out that Vista bashers that complain about UAC are idiots that only used antiquated systems or that live in the Mac fantasy world. Linux is no different than Vista - for almost everything I had to deal with "Cancel or Allow" prompts (editing configuration files in /etc, changing system time, launching administrative programs, etc). In fact, here the prompts are for the user's password - much like in Vista if you're logged on with a user that's not admin.


Where Linux lacks is usability (-) and in hardware support (-). If you get lucky and all works out of the box then you have a system that's quite good. Otherwise, you're screwed. My wife or an average Joe installing Ubuntu will not be able to deal with the problems I've encountered.


Here are some usability examples:

- in Display properties, the VisualEffects were set to None, and I cound not enable them (not even Normal). Eventually by running application I stumbled upon System/HardWareDrivers and there was an accelerated NVidia driver was available and installing it allowed enabling these effects. The driver is unsupported and required restart. Why DisplayProperties doesn't ask to install the appropriate driver I don't know...

- some menu items (like the Synaptic Update Manager) were not doing anything when invoked. There was no message to tell me what's wrong. ("sudo synaptic" from command line worked)

- setting up the printer was hard. I tried to connect to a printer shared by my domain controller. The printer dialog has an option to Browse network printers, but that was only listing the computers, not the shares; my guess is that Windows domain denied enumerating printers and shares from a computer not in a domain, and there was no option to specify domain user/password(-). I had to go to the Window machine, figure out the exact share name, type the share name manually in linux using smb://computer/printer_share and the domain user and password, after that all worked fine. I finally got my printer working, but I can't see my wife or my father doing the same thing...

- if you're using TsClient to connect to a Windows machine in full screen you'll find there is no obvious way to return to the linux desktop. It can only be done with a series of key combinations, and figuring that out is not easy (more on that on another post)


The Update Manager worked the first time. After a while it discovered new packages requiring updates, and it was prompting to download and install them. I agreed with the prompts, but the result was that UpdateManager was hanging (-).

Out of the box, Media Player does not play mp3, wma, mpg, files (-). It pointed me to download a codec (with an unintelligible copyright warning message), but when I agreed to download it, it hanged, too (-).

When these application hung, I could try to close them from the system menu using the Close command, or I could click the X button in the title bar, but the applications refused to close. (-). They had to be killed from Task Manager.

After a while, I noticed I had accumulated a number of "gsu" processes running. I suspected them to be related with the hangs, and I searched the Internet. It turns out the hangs were due to a known bug. Somehow, the Ubuntu configuration tools saved in the /etc/hosts file the computer name with a domain attached (Mars.Constantin.comcast.net) instead of the computer name (Mars). This caused "sudo" in command line to display an error "Mars not found" and it was preventing applications to display automatically the window where I was supposed to enter credentials to allow those applications to perform maintenance tasks (installing new software). As soon as I modified manually the /etc/hosts file, things got back to normal...


Linux was using APM for power saving, but waking the computer after 40 minutes was not working. The screen remained black no matter whether I was typing something on keyboard or using the mouse (-). I remembered back in the days I was using Ctrl-Alt-Backspace to restart X: it worked as workaround, but I wonder how many newbies are going to figure it out...


The wireless network was not working(-): the wireless card was not detected and not present in Network Manager. The help pages were useless. (-)

HP Pavilion tx1000 has a Broadcom 4321AG wireless card. On a Vista machine I turned to the community to find the solution... I already had a bcm43xx driver installed but not working (I found later it didn't supported my network card anyway). This driver was retired being replaced by b43 driver; I had this one, too, but this failed to load with missing dependencies. The solution described in http://aphesz.org/?p=87 was to use a Windows driver :-) from Dell support (I have HP!). You have to install ndiswrapper, run a couple of commands you have no idea what they are doing (and hope they do the right thing). After all this, the wireless interface showed in NetworkManager. You're not done yet... There you have to configure the WiFi access point (name, WAP password, etc). All in all, you get familiar with commands like ifup, ifdown, ndiswrapper, ifconfig, iwconfig, iwscan, etc. Too many things I didn't care about... I just wanted my wifi to work...

So, I got it to work, but on next reboot it stopped working (-). The WiFi was working, but failed to get an IP address from the DHCP server. To make things confusing, a new interface "wlan0:avahi" was present, that I didn't have before. After more hours of searching the net, it turned out this is a known issue that's been there for at least 2 versions of Ubuntu; other distributions are affected, too. I was not able to find a good solution (what I found was not working for me, or were recommending to modify files that I didn't have - they were for other linux distributions). I gave up eventually and I'll keep doing "sudo ifdown wlan0", "sudo ifup wlan0" whenever I'll need WiFi...


Btw, if you're like me and thought the WiFi configuration tool in Windows sucks, wait until you see the one in linux. It looks like evertytime one switch the wifi network he's connecting to, he will need to mess up with the access point settings. Using the laptop at home and at work with Wifi will be a pain. (Yeah, yeah, I can write my own scripts that switches configurations, restart the network, etc, but why does it have to be this way?)


Conclusions:

All in all, this was an interesting experience. Linux has definitely advances since last time I looked at it, and is definitely usable on desktop if you find it pre-configured with everything already working and you only do basic tasks (browsing, editing, etc.). However, I wouldn't recommend using it if you're not a computer geek. There are still a lot of usability problems, and bugs that will make you spend hours searching the net for a solution. Sooner or later you'll try to connect a new device, printer, etc and will run into more problems - be prepared to deal with them. Wifi is the biggest offender for configuration and usability.

This is not the year of the linux on desktop, and by the looks of it, it won't be very soon either.
Until everything will "just work" without quirks and usability problems, I'm staying with Windows.

Sunday, June 8, 2008

Lumanari de botez in Seattle (Finding candles for orthodox baptism in Seattle)

This is a post I wanted to write one year ago when I was looking for candles for the baptism of our godson, Cosmin. At that time we spent a fair amount of time running in circles for a store named Kaufland, Kaufman or something like this, whose address we didn't know exactly... The church staff couldn't help us either, being as clueless as we were...

Eventually we found the shop and solved our problem, and I considered writing a blog post for other Romanians looking for candles, but I forgot. Today I was looking for the same store (I found it faster on the Internet this time), and I remembered to write it in case I'll need it ever again....


If you're looking for baptism candles (lumanari de botez) in Seattle, it should be easy this time: look for Kaufer's Religious Supplies, which is located at 901 Harrison St., Seattle.

Usually, the Romanian baptisms (botezurile) in Seattle are held at St Spiridon Cathedral Orthodox Church, which is conveniently located on the same street as the store. From the church head west on Harrison street, the store should be on the left side.


The store has catholic religious supplies; thell the clerks what you need. The candles are usually 24 or 36" long, simple (not ornated), and can be either extreme white or a bit yellowish (from beeswax).

Good luck!

Tuesday, February 19, 2008

The SAK source control strings in Visual Studio's project files

If you opened up with notepad a project file used by VisualStudio you may have noticed 4 strings used for source control integration that have all "SAK" values.

It's pretty much up to the project to persist these 4 values any way the project likes.

In C# or VB project files these strings appear in the PropertyGroup section of the project:

<Project xmlns="http://schemas.microsoft.com/developer/msbuild/2003">
<PropertyGroup>
<SccProjectName>SAK</SccProjectName>
<SccLocalPath>SAK</SccLocalPath>
<SccAuxPath>SAK</SccAuxPath>
<SccProvider>SAK</SccProvider>
</PropertyGroup>


Similarly, in a VC project the strings appear as attributes on the VisualStudioProject xml node

<VisualStudioProject ....
SccProjectName="SAK"
SccAuxPath="SAK"
SccLocalPath="SAK"
SccProvider="SAK" .... />


Or in a Setup project files the strings appear as follow:

"DeployProject"
{
"SccProjectName" = "8:SAK"
"SccLocalPath" = "8:SAK"
"SccAuxPath" = "8:SAK"
"SccProvider" = "8:SAK"
....
}


So, what are these strings and what is their meaning?

The 4 strings are used to store the source control bindings of a project. The source control integration and the project exchange these strings using SetSccLocation and RegisterSccProject function calls, and the projects persist the 4 values in settings with names resembling the function arguments (lpszSccProjectName, lpszSccLocalPath, lpszSccAuxPath, lpszSccProvider)

VisualStudio 2003 and older supported only MSSCCI source control providers for scc integration. In MSSCCI, the IDE (VS) needs to persist 3 connection strings (the strings are required for the SccOpenProject calls). The connection strings are provider-dependent, and VS stores these 3 strings plus a 4th one (identifying the provider) in the solution and project files. However, storing the real bindings in the project files makes life harder for developers if the projects are moved either in source control or on local disk, or if the projects are branched, etc. To reduce these problems, VisualStudio tries to take advantage of the settings persisted by the source control provider in the mssccprj.scc files (when possible), and stores in the project files just a flag that tells the scc integration package that the project is under source control. The real bindings are persisted by the scc provider (in the mssccprj.scc files) and VS reads them from there and uses them when needed.

And there you have it: when all 4 source control connection strings in a project have "SAK" values, this is just a flag that tells VS that the real source control bindings of that project are persisted by the MSSCCI scc provider (not by Visual Studio) and should be read from the mssccprj.scc file written by the scc provider in the same folder as the project file.

To my knowledge, the "SAK" strings are the initials of Sumedh A. Kanetkar who worked for source control integration back in 2000 (could it be a coincidence?), but that's not very important. The strings could have been any distinct values that could be recognized later and used as a flag (except empty values - empty string values are understood by projects as "the project is no longer under source control" in the call to SetSccLocation).

Recently, I've seen another interesting interpretation of these values for Team Foundation Server provider. In this forum post Richard says "SAK" stands for "Should Already Know", because TFS should be able to determine the source control bindings implicitly.
This is more or less true for TFS.

Technically, TFS has enlistment/workspace management functionality, and this information is stored on the TFS server, not on the client. Thus, TFS is always able to calculate the source control bindings of a project, so it's true, TFS provider "should already know" the scc bindings of a project just based on the location of the project file on disk, and it doesn't need to persist real bindings in the project files.
TFS scc provider in VS2005 and later is a VSIP source control provider, that has full control over what information is written in the solution and project files. TFS could have used and passed any other string values to the project systems to be persisted in the project files.

To work with VS 2003, TFS also implements a MSSCCI provider that creates mssccprj.scc files (so when a project is added to TFS in VS2003 the scc bindings are usually written having SAK-values with their MSSCCI sense). To make easier the migration path (when such VS2003 project is opened in VS2005) it makes sense to me that TFS would re-use the same SAK strings for TFS VSIP provider. I suspect this is one of the reasons TFS source control provider in VS2005 and VS2008 also writes SAK values for the 4 binding strings.

Tuesday, January 8, 2008

Yahoo mail error -2146823279 gExtContent is undefined

In the last couple of weeks I got error messages every time I tried to login to Yahoo! Mail.


Yahoo! Mail experienced a login error:
name:TypeError
message:'gExtContent' is undefined
number:-2146823279
description:'gExtContent' is undefined

Yahoo! Mail experienced a login error:
name:TypeError
message:Object required
number:-2146827864
description:Object required

Yahoo mail error -2146823279 gExtContent is undefined


However, if I clicked "Try again" in the next page, I could access my mail without problem.

Final page, click Try Again


For a while I just ignored these errors, but today they bothered me enough to make me try fixing the problem.

I searched the error message on Internet and I found two recommended solutions:
- clear up the browser history, temporary file cache, cookies, etc., and try again
- switch temporarily to Yahoo Mail Classic (there is link in top of page), then switch back to the new style

While these solutions have worked in the past for me for similar Yahoo errors, today they had no effect.

However, when I read more carefully the last error page, I realized it was talking about a program modifying the html page and about firewall settings blocking ads.

It then hit me I was running an Internet Explorer add-on program, IE7 Pro 2.0 that I use for blocking image-ads and Flash-based ads.

Ad blocking in IE7 Pro can be easily disabled from the context menu (not from firewall settings).

Disable ad blocking in IE7 Pro
As soon as I disabled ad blocking, Yahoo! Mail page opened without problem.

For a permanent solution, I enabled back ad blocking in IE7 Pro, accessed the Yahoo Mail account (got again the errors), and when I got the "Click here to try again" page, I used IE7Pro context menu to select "Ad Blocker / Don't filter this site".